Earlier, I posted about creating an Angular 4 app with VS 2017 and also posted a guide to upgrade an Angular 4 app to Angular 5 with VS 2017. Now you can also create Angular 5 app with Visual Studio 2017, without installing any third-party extensions or templates. This post talks about how to create an Angular 5 App with Visual Studio 2017 and how to extend it with a simple example.
How to create an Angular 5 app with Visual Studio 2017
If you want to learn all of Angular, I want to personally recommend ng-book as the single-best resource out there. You can get a copy here.
The new Angular 5 template is available with the ASP.NET Core 2.1 release and ASP.NET Core 2.1 preview 1 is recently released. Therefore, to use the new Angular 5 template, following installation is required.
- Download .NET Core 2.1 Preview 1, on Windows, MacOS, and Linux:
- .NET Core 2.1 Preview 1 SDK — includes the Runtime
- .NET Core 2.1 Preview 1 Runtime
- Visual Studio 2017 Latest Preview Version : Don’t worry. Visual Studio and Visual Studio “Preview” can be installed side-by-side on the same device. It will have no impact on your current stable VS installation.
The installation will take some time to install. Once both the installations are finished, open Visual Studio “Preview” version, hit Ctrl+Shift+N and select the ASP.NET Core Web Application (.NET Core) project type from the templates. When you click Ok, you should be prompted with the following,
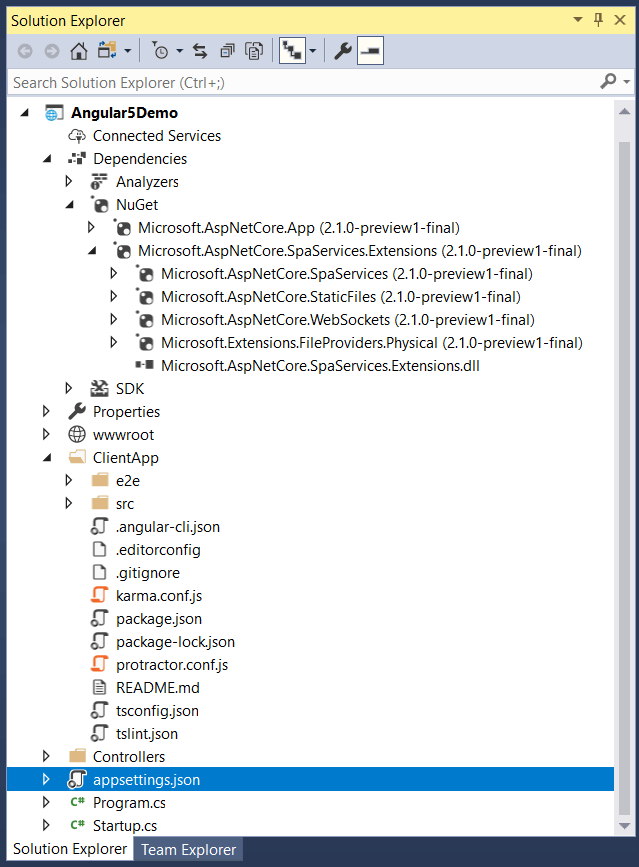
Make sure to select “ASP.NET Core 2.1” from the version dropdown and choose Angular. The Visual Studio will create an ASP.NET Core 2.1 based project with Angular 5 configured. You should see the following project structure.
Similar to Angular 4 app, JavaScriptServices is used for Angular 5 app with ASP.NET Core. JavaScriptServices is a collection of client-side technologies for ASP.NET Core. Its goal is to position ASP.NET Core as developers’ preferred server-side platform for building SPAs. It includes support for the client-side frameworks – Angular, React and React + Redux.
You can verify the Angular version in package.json file placed in the ClientApp directory.
There are a couple of things to take note of.
- The
ClientAppfolder contains the Angular app and this Angular app is a standard Angular CLI application. This allows you to execute anyngcommand (e.g., ng test), or usenpmto install extra packages into it. - There is no
webpack.config.jsfile present in the solution. That doesn’t mean that Webpack is not used as a module bundler. Angular CLI uses Webpack and effectively puts together a Webpack config file on the fly based on the project configuration options you pass in. Angular CLI loads its configuration from.angular-cli.jsonfile stored in ClientApp directory.By default, Angular CLI manages the underlying Webpack configuration for you so you don’t have to deal with its complexity. If you wish to manually configure Webpack in your Angular application, you can run the following command at the ClientApp directory location:
$ ng eject
You may receive an error saying “Your package.json scripts must not contain a build script as it will be overwritten.”. To fix this error, use the following command.
$ ng eject --force
You should see the following output on the terminal window.
When this command is executed, below things happen behind the scene:
- A property
ejected: trueis added to the.angular-cli.jsonfile. - This will add a
webpack.config.jsfile in the ClientApp directory with a standalone Webpack configuration so you can build your project without Angular CLI. - The
scriptssection of thepackage.jsonfile gets updated. Here is the old content,"scripts": { "ng": "ng", "start": "ng serve --extract-css", "build": "ng build --extract-css", "build:ssr": "npm run build -- --app=ssr --output-hashing=media", "test": "ng test", "lint": "ng lint", "e2e": "ng e2e" },Here is the new updated
scriptssection."scripts": { "ng": "ng", "start": "webpack-dev-server --port=4200", "build": "webpack", "build:ssr": "npm run build -- --app=ssr --output-hashing=media", "test": "karma start ./karma.conf.js", "lint": "ng lint", "e2e": "protractor ./protractor.conf.js", "pree2e": "webdriver-manager update --standalone false --gecko false --quiet" },The app now no longer uses Angular CLI to build and run, instead uses Webpack. That means the
ng buildcommand no longer builds the app, instead usewebpackcommand (as mentioned inscriptssection). This also allows you to manually update the Webpack configuration as per your need.If you wish to go back to Angular CLI, go into your
.angular-cli.jsonfile and remove theejectedproperty and restore thescriptssection to use Angular commands. No need to delete thewebpack.config.jsfile.
- A property
- When this app starts in development mode, it also starts its own instance of the Angular CLI server in the background. This is convenient because your client-side resources are dynamically built on demand and the page refreshes when you modify any file. To verify this, execute
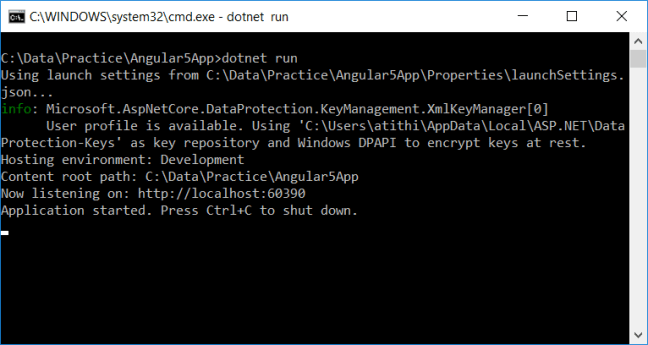
dotnet runcommand and notice thatng servecommand is also executed.This is happening as the project is configured in this way. Open Startup.cs and see the
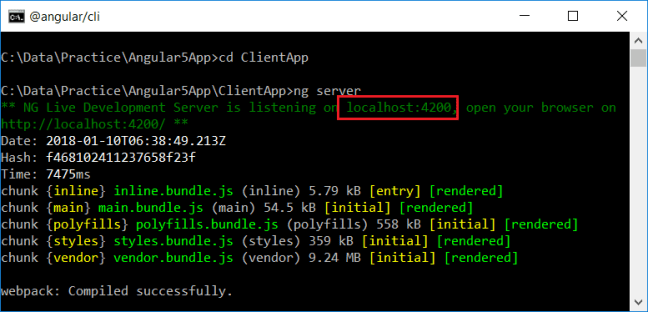
configuremethod code. TheUseSpamiddleware runs the Angular CLI in development mode.This has advantages but also has a drawback. In case of any C# code change, we need to restart the application and this in turn restarts the Angular compiler. If you are making frequent C# code changes, this will increase the application compile time. To speed up things, the Angular server can be run as a standalone process, independent of the ASP.NET Core process. You can connect to it from the ASP.NET application. To do that, navigate to ClientApp directory on command prompt and run
ng servecommand to start the Angular server.Copy the development server URL from the command prompt, and replace the following line in Startup.cs,
spa.UseAngularCliServer(npmScript: "start");
with,
spa.UseProxyToSpaDevelopmentServer("http://localhost:4200");Execute the
dotnet runcommand and you will notice it no longer execute ng serve command in the background. - By default, Server-side rendering is disabled. You can follow the steps given on official documentation to enable SSR.
- In production mode, development-time features are disabled, and your
dotnet publishconfiguration automatically invokesng buildto produce minified, ahead-of-time compiled JavaScript files.
When you run the app, you should see following in the browser.
If you want to learn all of Angular, I want to personally recommend ng-book as the single-best resource out there. You can get a copy here.
Let’s extend this application a bit. Here, the fetch data component calls an API to get random weather forecasts. Like,
Earlier, I posted Bind Select DropDown List in Angular 2 and let’s add a dropdown on top of the grid to filter the data based on the selected value. Below is the API code to return summary list and weather forecasts. The new API added to the sample code is GetSummaries()
private static string[] Summaries = new[]
{
     "Freezing", "Bracing", "Chilly", "Cool", "Mild", "Warm", "Balmy", "Hot", "Sweltering", "Scorching"
};

[HttpGet("[action]")]
public string[] GetSummaries()
{
    return Summaries;
}
Next, update the code of fetchdata.component.ts to call the GetSummaries, along with WeatherForecasts API. We also need to define another method to filter the forecast based on the selected value in the dropdown.
Lastly, put this HTML in fetchdata.component.html to show the summary dropdown.
<div>
    <label>Summary: </label>
    <select (change)="filterForeCasts($event.target.value)">
        <option value="0">--All--</option>
        <option *ngFor="let summary of summaries" value={{summary}}>
            {{summary}}
        </option>
    </select>
</div>
Run the application and navigate to fetch data. You should see a drodown having list of all the summaries. Changing the selection will also update the weather forecast grid.
That’s it. It’s really easy to create Angular 5 app without worrying about required configurations and package installation.
Bonus Tip: You can also create Angular 5 app using dotnet cli
Angular 6 is out and you can upgrade this application to Angular 6. Read this step-by-step guide to upgrade this app to Angular 6.
Also, if you are looking to upload a file from an Angular 5 app to ASP.NET Core Web API, read this post.
Conclusion
To conclude, the new Angular 5 template is based on Angular CLI standard which allows developers to execute Angular commands. It is backed by ASP.NET Core JavaScriptServices and Webpack for bundling. This post also talks about injecting Webpack manually, instead of using the default configured Webpack with Angular CLI. At the time of writing this, all the things are in the preview stage, but it is very unlikely to change much when the final version comes out.
Thank you for reading. Keep visiting this blog and share this in your network. Please put your thoughts and feedback in the comments section.


Nice, easy to follow, article.
Now Angular 6 is stable and Angular 7 is recently released.
Is it possible to upgrade this articles project to Angular 6 or 7?
I have followed some guides on the net with failure as result. None of them are base on a Angular project created in VS 2017, so some things must be different.
I have already posted about angular 6 and angular 7 about upgrading and creating new projects based on these version. These links will help you.
https://www.talkingdotnet.com/create-an-angular-7-app-with-visual-studio-2017/
https://www.talkingdotnet.com/upgrade-angular-6-app-angular-7-visual-studio-2017/
https://www.talkingdotnet.com/upgrade-angular-5-app-angular-6-visual-studio-2017/
https://www.talkingdotnet.com/how-to-create-an-angular-6-app-with-visual-studio-2017/
Thanks. I followed the create angular 7 and ported all my code to the new site. Worked like a charm…almost. Some small things had to be adjusted but no bigger problems.
Great article.
Nice article as I am very new to Angular 5. I got the demo up and running in VS 2017 preview, and was able to add the drop down list to filter the grid. However, every time I run the app in Visual Studio, it takes 25-30 seconds to load in the browser.
Initially while loading the app, it would take some time to start the app.
have you tried the webapi “GetSummaries”, it seems enable cors by default
Nice article. If you are interested in another approach using system.js ang gulp you can check:
https://asptemplatestack.com/blog/postname/dot-net-core-angular5-create-real-world-app-part-1
Good topic, but when you upgrade your packages as per your instructions. The web pack build fails.
There are no package upgrade instructions mentioned in this post. Can you please tell me in detail what are you referring to?
FYI, looks like they’ve updated the .NET Core 2.1 Preview, now requires a newer version of VS 2017 Preview for new installations:
From the download page you linked:
” To use .NET Core 2.1 with Visual Studio, you’ll need Visual Studio 2017 15.7 Preview 1 or newer. Make sure you’ve got the latest Visual Studio 2017 Preview.”
Yes, you are right. Updated the post.
which angular version is stable. i have started learning angular 5
Angular 5 is stable and you can start with it.
How does it handle CORS? Since it’s different ports for frontend and backend I’m assuming it would have some issues regarding that.
Btw, very nice guide, really liking your blog.
Hi, how to add authentication to angular??
This should help you to get started..
https://www.pointblankdevelopment.com.au/blog/113/aspnet-core-20-angular-24-user-registration-and-login-tutorial-example
Hi, Do you know how to create the Angular App with Authentication made on the asp.net mvc ??
Hi,
How to publish this app from visual studio 2017. Please tell me have you tried publishing this app.
I have not tried yet but it should work with the standard publishing app.
Hi, Can you please help in publishing the standard publishing app I am getting the error
error running node node_modules/webpack/bin/webpack.js –env.prod
I dont know why this error is coming and I have searched a lot but nothing works Please help me.
Thanks you
Vishesh Mahake Delete Your Bin And Obj Folder Thats Will Solve Your Problem